
How to transform and publish END shapefiles and GeoPackages

This tutorial reviews the steps required to transform local noise data to an Environmental Noise Directive (END)-compliant GeoPackage. Before we begin, let’s review a list of the resources we need:
Software
If you are not a hale»connect customer, sign-up for a free trial account
Tutorial Data
- Source noise data. You can download the data here.
- You can find additional examples of transformation projects and source data in the GitHub repository for END GeoPackage Encoding Standards here.
Creating a Transformation Project
1. Load Source Schemas
Once you have successfully installed hale»studio, launch the application on your desktop.
If you are working with the linked source data, download the source data folder and unzip the compressed folder.
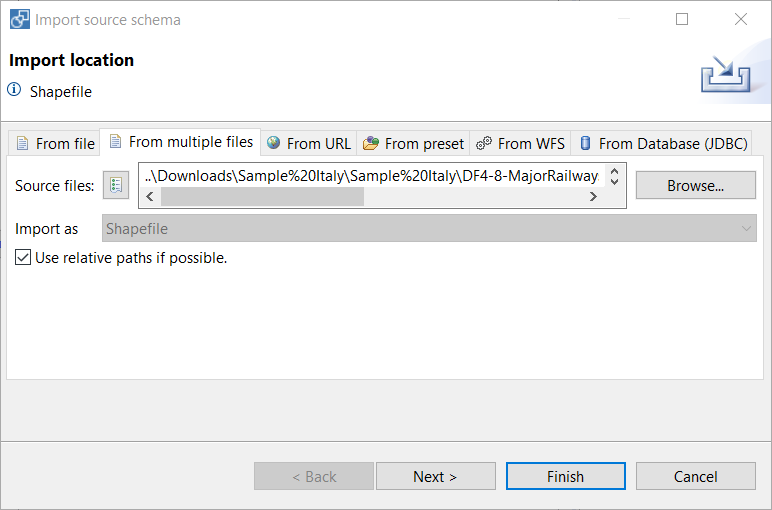
Click on the File menu » Import » Source schema to begin loading the source data schemas.
TIP: Select the From multiple files-tab to load more than one shapefile schema from the DF4-8-MajorRailways-IT-NoiseContours folder. Select more than one file using the Ctrl key.
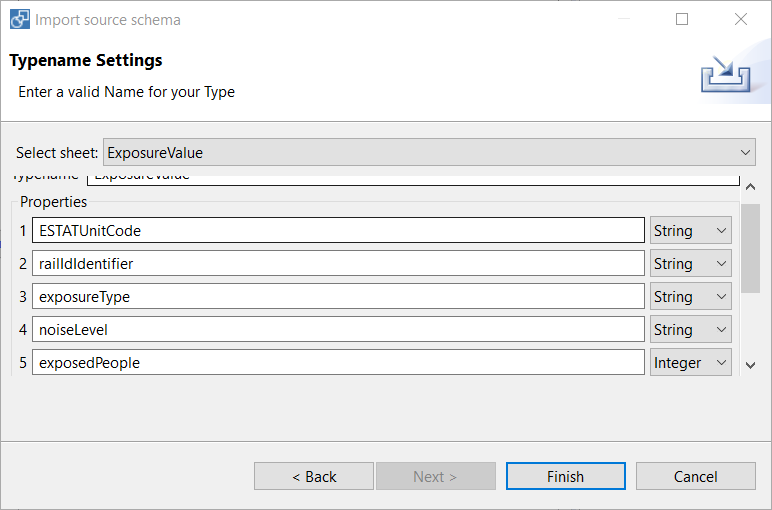
Next, load the DF4-8-MajorRailways-IT-NUTS2.xlsx file as source schema. Repeat this step three times to load each sheet from the .xlsx file. Select the sheet to import from the drop-down menu. Change the data type of the exposure fields to Integer.
Before moving on to the next step, save your project locally.
2. Load Target Schema
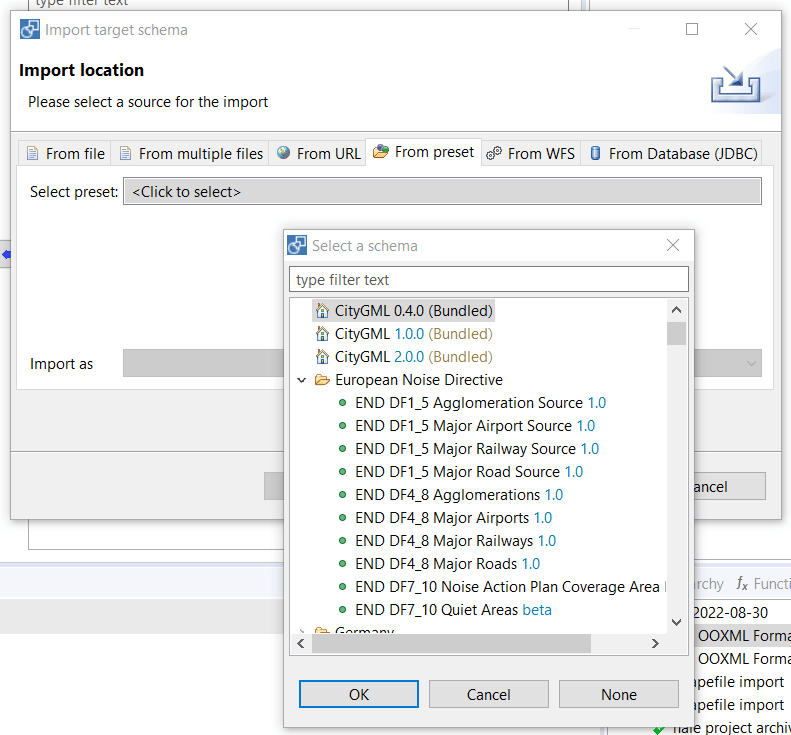
Click on the File menu » Import » Target schema to load the target data schema. The END GeoPackage templates are available in hale»studio under the From preset-tab. Navigate to the folder entitled European Noise Directive and select the END DF_8 Major Railways schema.
3. Complete the alignment
Please view the webinar demo section to review the steps required to complete the alignment.
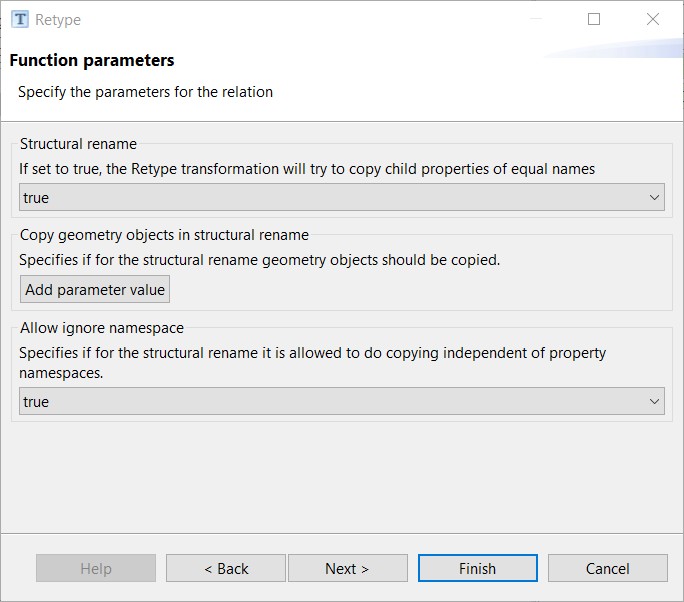
TIP: Each of the source feature types should use a Retype function to map to the corresponding feature type in the target schema. Check the Structural rename parameter for the Retype functions set on the feature types in the Excel table to automatically map all attributes that share the same name from the source to the target.
You can download the completed alignment transformation project here.
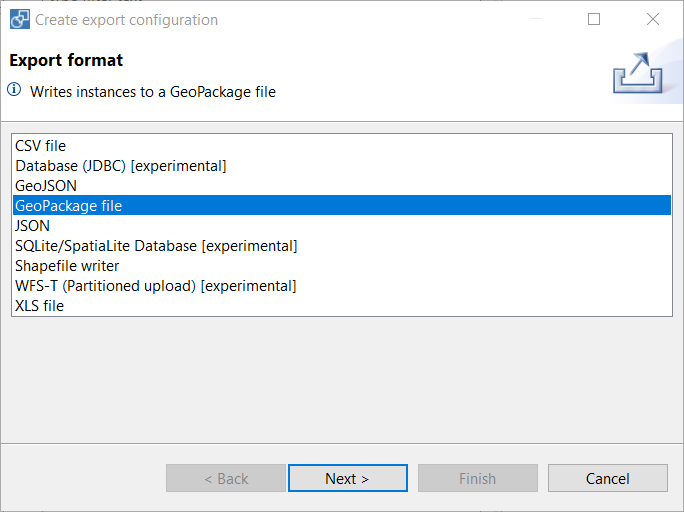
4. Set export configuration
Users working with GeoPackage as the target schema in hale»studio transformation projects can now use those projects in online transformation configurations on hale»connect. Transformation projects require a custom data export configuration with GeoPackage selected as export format.
hale»connect first searches for custom export configurations named hale-connect and applies the export configuration if found. Next, hale»connect searches for custom export configurations named default. Otherwise, hale»connect will use the default configuration which exports to GML FeatureCollection.
To apply a custom export configuration, click File » Export » Create custom data export and add your selected output file format, output CRS and any additional parameters you would like to set in the wizard.
Save your project.
Publishing an END-compliant GeoPackage on hale»connect
The hale»connect platform can be configured to enable users to publish, transform and validate datasets, metadata, and services within minutes. Automated workflows only need to be configured once and can be re-used multiple times by any user in an organisation. For users with data that is frequently updated, automated transformation workflows make updating and republishing view and download services easy. hale»connect can quickly and automatically rerun transformations and republish services and metadata to reflect changes in source data.
1. Log-in to hale»connect in hale»studio
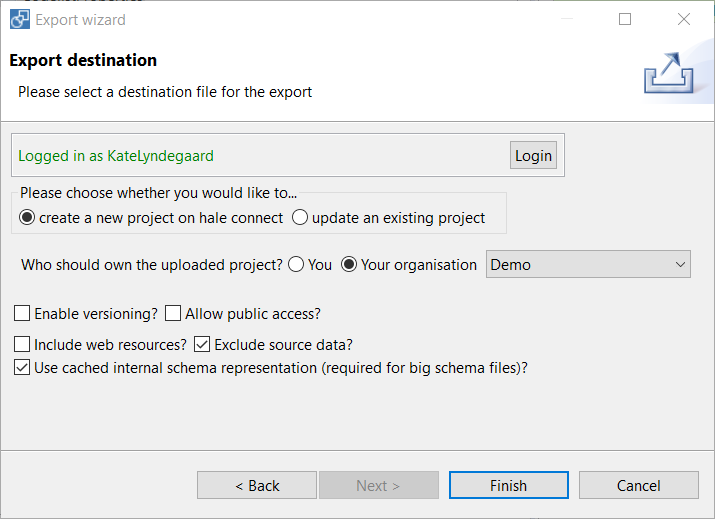
The integration between hale»studio and hale»connect enables hale»connect users to log-in to the online platform via the hale»studio UI to upload, update or download transformation projects. Click on File » Login to haleconnect to login. Provide your username and password.
Next, export your completed transformation project to the hale»connect platform. Click File » Export » hale connect project. Give your project a name and description if it is not already populated.
Select the radio button to create a new project on hale»connect. Select your organisation from the drop-down menu and click Finish. Your transformation project is now available online in your hale»connect organisation at the provided link.
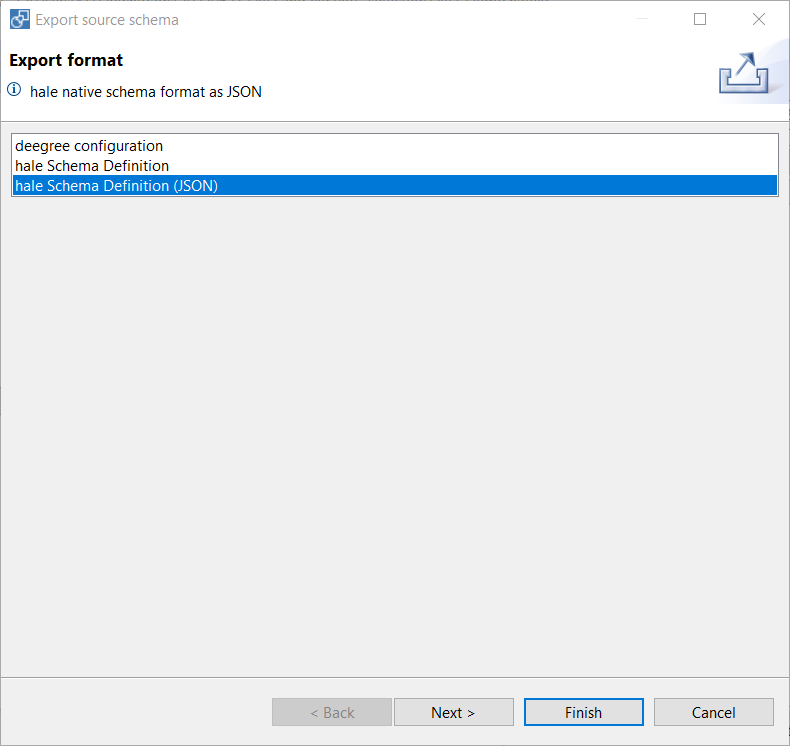
2. Export json.hsd schema files from hale»studio
Users can export GeoPackage schemas as json.hsd files from hale»studio for use in hale»connect. The functionality enables END (Environmental Noise Directive) implementors to validate END-conformant GeoPackages on hale»connect.
Before exiting the hale»studio project, click File » Export » Source schema and select hale Schema Definition (JSON) to download the json.hsd source schema file for use in hale»connect. Repeat the process to download the json.hsd target schema file. The .hsd file format is a native hale»studio schema definition file.
3. Configure an online transformation workflow in hale»connect
Publishing an online transformation to generate END-compliant GeoPackages requires the configuration of multiple resources on hale»connect. Before we begin, let’s review a list of the resources we need:
- hale»studio transformation project
- json.hsd schema(s) for your source data
- json.hsd schema(s) for your target data
- source theme
- target theme
- source dataset
Step 1: Create Schemas
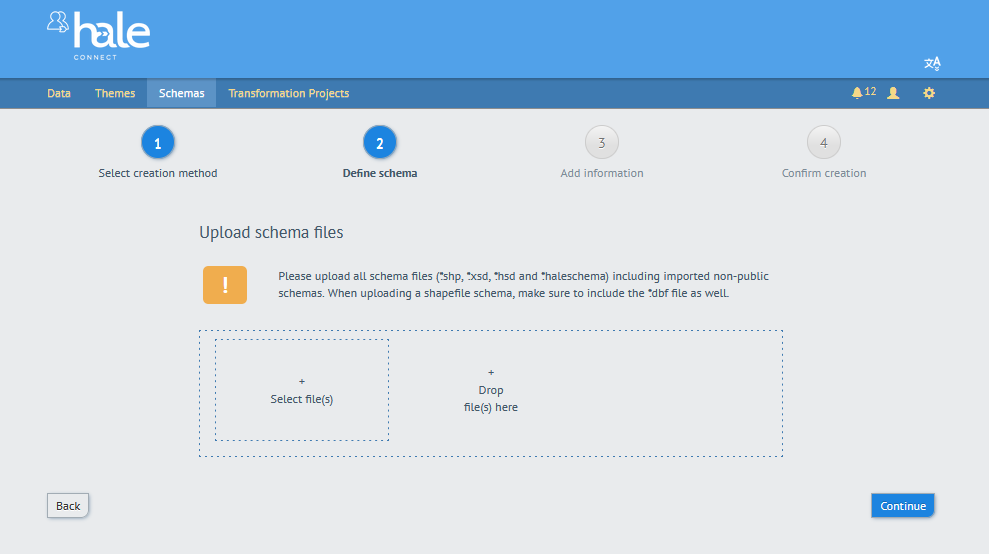
To create a new schema based on a json.hsd file:
Go to “Schemas” on the main toolbar
Go to “Create new schema” at the bottom of the schema list
Select creation method. In the first step, select «Upload schema file». Click «Continue»
Click the «Select file(s)» button and navigate to the json.hsd source schema you exported from hale»studio. When you are finished, click «Continue»
Add information. Provide the name, author, type, and version of your schema. When you are finished, click «Continue»
Confirm creation. In the final step, review your schema. You have the option to add or create a theme for your schema.
Toggle the switch to enable the creation of a theme. When you are finished, click «Create» to save the schema and create an associated theme.
Repeat the process for the target json.hsd schema file to create your target schema on hale»connect.
Step 2: Configure source theme
In this step we will configure the source theme to perform an online transformation and publish webservices.
First, navigate to the source theme you created in the previous step.
Go to “Themes” on the main toolbar
Enter the name of your source theme in the search bar.
When you create a theme during schema creation, your theme is automatically given the same name as your schema. You can also use the dropdown menu next to “Sort order”. Select “Last modified” to view your most recent themes.
- Select your theme from the list of resources
Next, we will add a transformation configuration to the source theme in the Transformation section.
A transformation configuration associates a transformation project and target theme to your source data. The configuration tells hale»connect what to do when you upload new, or updated data. In this tutorial, we want hale»connect to run an online transformation and publish the transformed, INSPIRE compliant GeoPackage data every time the source data is updated. Let’s do that now.
Click the section named "Transformation"
Click the “Add new transformation configuration” button

Click the “+ Select project” button and navigate to the transformation project you uploaded to hale»connect.
Click the » button to add the transformation project.
Click the “+ Select target theme” button and navigate to the target theme you created during schema creation in the previous step. The target theme provides hale»connect the information it needs to publish the transformed data.
Click “Add configuration”
We have now added a transformation configuration to the source theme.
Step 3: Configure a target theme
In this step, we will configure the provision of INSPIRE-compliant view and download services. The target theme defines how your transformed, END GeoPackage is published. Themes enable you to choose the types of webservices which are offered (WFS, Predefined dataset, WMS), the spatial reference systems of services and much more. Let’s look at some of the options now.
First, navigate to the target theme you created during schema creation in Step 2.
Go to “Themes” on the main toolbar.
Enter the name of your target theme in the search bar.
When you create a theme during schema creation, your theme is automatically given the same name as your schema. You can also use the dropdown menu next to “Sort order”. Select “Last modified” to view your most recent themes.
- Select your theme from the list of resources.
Next, we will configure the View service settings.
- Click the section named View services.
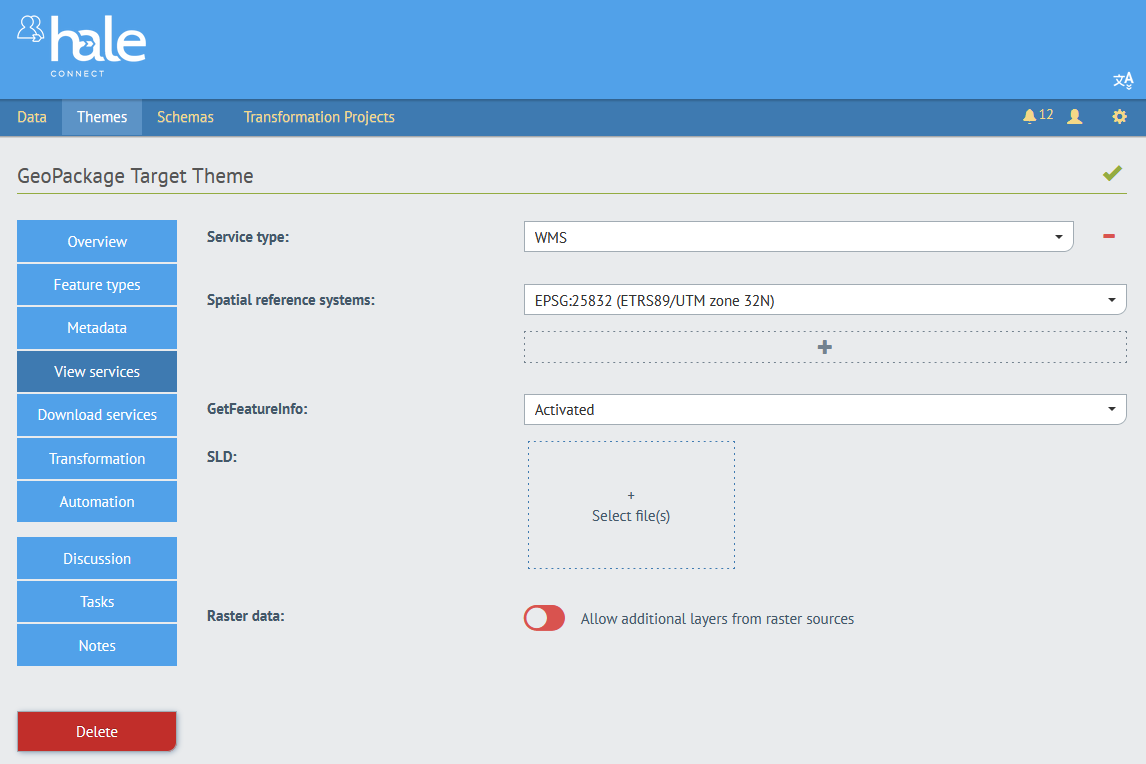
Click the “+” button under the default spatial reference system to add an additional spatial reference system.
Add the INSPIRE compliant spatial reference system EPSG:4258. You can edit the default spatial reference system and add as many additional spatial reference systems as you like. Your view services will be available in the spatial reference systems you configure in this setting.
Click the dropdown menu next to GetFeatureInfo. Activating GetFeatureInfo allows your WMS to be queried.
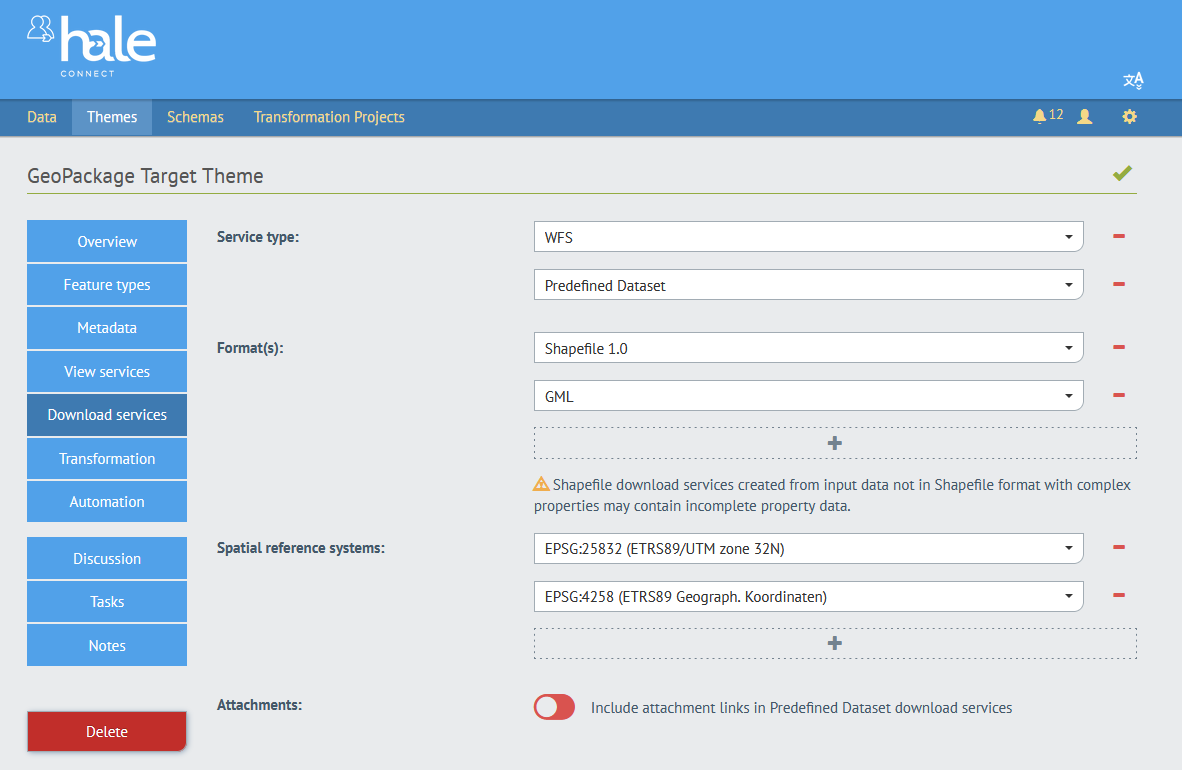
Now let’s look at the Download service settings.
Click the section named Download services
Click the “+” button under Predefined Dataset to add an additional service type
Select WFS from the dropdown menu.
Now the download services will be available as both an ATOM feed (Predefined dataset) and as WFS.
Click the “+” button under Shapefile 1.0 to add an additional data format
Select GML or GeoPackage from the dropdown menu.
Now the Predefined dataset will offer all file types in the download options. The downloads will be available in each of the spatial reference systems you configure in the Download service settings.
Step 4: Create a source dataset
In the final step, we will create a source dataset and execute the online transformation workflow we configured in this tutorial. With both source and target themes configured, we can upload data, run an online transformation, and publish INSPIRE view and download services in just a few clicks.
Go to «Data» on the main toolbar
Go to «Create new Data Set» at the bottom of the dataset list
Select your source theme to link to your dataset.
Click «Select file(s)» and navigate to the tutorial data. If you are working with shapefiles, we recommend that you upload them in a .zip file.
Give your dataset a name. This name should enable you to quickly und clearly identify the dataset in the system.
Provide metadata for your dataset. There are several ways to add metadata for a dataset. For more information, visit our help section.
In the final step, you can review the steps of the publishing and transformation process configured for the theme. You will see five toggle switches to publish download and view services for your source dataset, to transform the new dataset, and to publish services for the transformed dataset.
- Activate all the toggle switches and click «Create»
hale»connect will run the online transformation workflow and automatically direct you to your newly published source dataset.
To view your transformed dataset:
- Click the section named Transformed Data
- Click the transformation project listed in the panel
- Click the link under “Target dataset:” to view your INSPIRE view and download services for your transformed GeoPackage data
- Click the View services section of your transformed dataset
- Click “Map view” to explore your new, transformed dataset
In this tutorial we created an END transformation project and configured an online transformation workflow which can be reused by multiple users, as often as necessary. Once it is configured, it can be easily edited or updated to reflect your changing needs. You can update your existing hale»connect transformation project directly from hale»studio and edit your existing source and target themes if you require changes. When your source data changes, the online transformation workflow will automatically rerun the transformation and republish your INSPIRE services to provide your users with the most current version of your data.
Learn more…
If you are interested in learning more about harmonizing END data, or publishing INSPIRE-compliant services for your END data, please see the following links below: